Ready to tackle an invisible zipper? Please promise me you won’t let what anyone else says about how hard zippers are stand in your way! Ok, ready? We’ll talk about invisible zippers and then sew up a pillow using one. (I promise these are so easy, you’ll wonder why you haven’t started using them before!)
You’ll need:
16″ pillow form
1/2 yard of fabric
1 4″ invisible zipper (I get mine from ZipIt on Etsy, she ships fast and the prices are awesome!)
Coordinating thread
Your machine’s zipper foot
Let’s talk zippers and zipper feet for a minute:
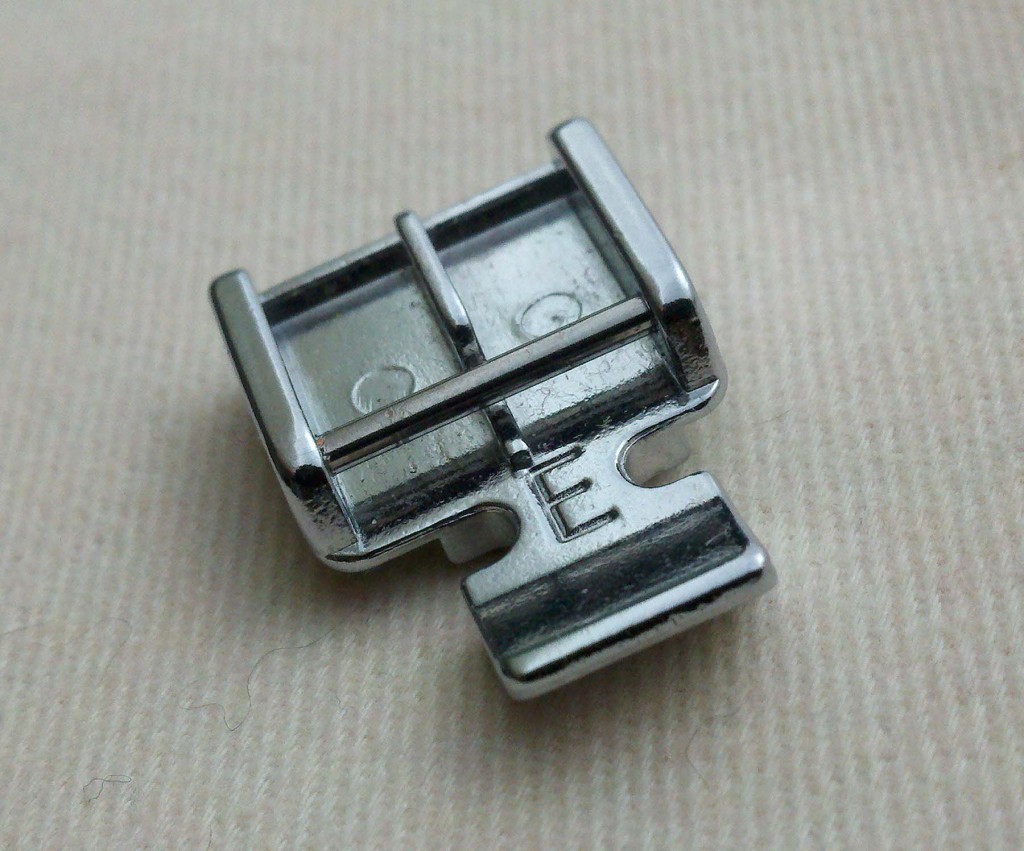
My zipper foot for my Janome looks like this:
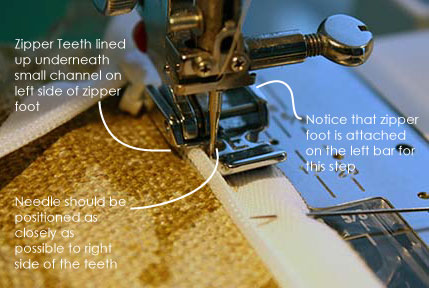
It’s got two different bars that can attach to your machine. One on the left and one on the right. We’ll use both sides for this project.
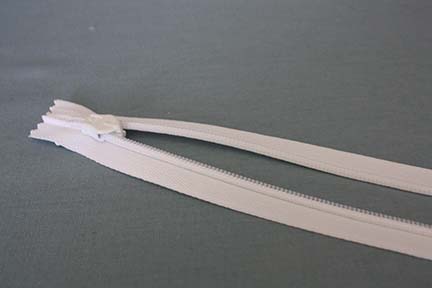
Before pinning and sewing an invisible zipper there’s a little bit of prep work we need to do. Set your iron set on a medium-high setting. While you’re waiting for the iron to heat up, let’s talk about the zipper for a bit. Invisible zippers look backwards compared to a regular zipper. A regular zipper has the zipper pull and the teeth showing on the same side. An invisible zipper has the zipper pull on one side and the teeth showing on the opposite side.
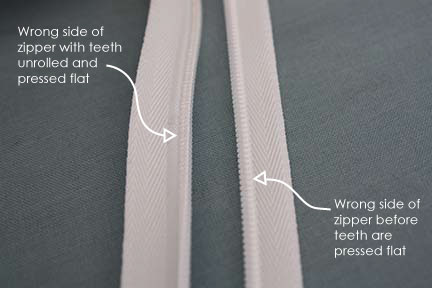
This is what the back of an invisible zipper looks like. Notice that the teeth are curling back and facing up. The zipper pull is facing down. Now for the prep work! We need to use the tip of a hot iron to press the zipper teeth flat. It will be easier to sew alongside the teeth if they are pressed flat or standing up instead of curled back and around. To do this, unzip the zipper as far as it will go, unroll the zipper teeth, and press flat.
When you’re done with your pressing, the back side of your zipper should look like the zipper side on the left. Now we’re ready to sew on your zipper and complete your pillow.
Pillow Time!
First, cut two squares of fabric that measure 16 1/2″ x 16 1/2″.
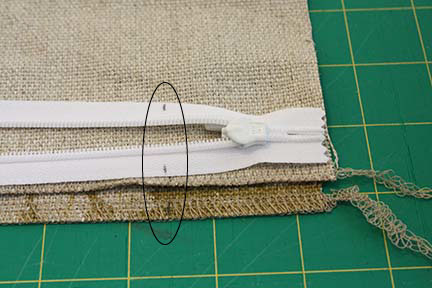
To make sure that we’re sewing on the zipper to the right spot on both your front and back pillow pieces we’ll draw a couple of marks on both squares and the zipper. Stack both of your fabric pieces right sides together and place your zipper on top. Measure 2″ in from one side and make a small mark on both fabric pieces and both sides of the zipper with a fabric marking pen. You can see my small ones in the picture above. (I did serge my ends before doing this. That’s optional though! I’ve done plenty of pillows without serging the ends and it’ll be just fine.)
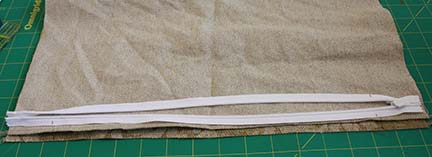
Repeat the process with the other side. In the picture above you can see my small marks 2″ in from both sides.
Zipper Hint: When we sew ANY zipper on, we need to make sure we know which side is the right side of the zipper. Just like sewing two pieces of fabric with right sides together we’ll need to attach the right side of the zipper to the right side of the fabric. It’s super easy to figure out which is the right side of the zipper. It’s ALWAYS the side with the zipper pull! Whether you have a regular zipper or an invisible zipper just look for the zipper pull and you’ve found the right side of the zipper.
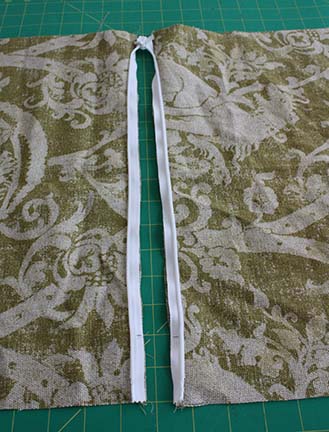
Now that you’ve found the right side of your zipper, place it down touching the right side of your front pillow piece. (It should be along the bottom of your fabric.) Match up the marks you made, slide the zipper tape right along the edge of the fabric, and pin.
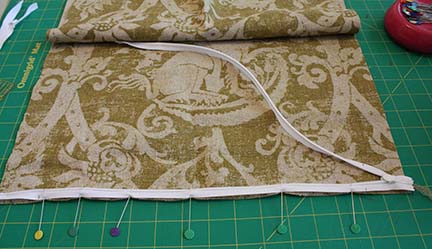
When you’re done pinning it should look something like this. Now we’re ready to sew! We’ll also use the marks that we made as our stopping and starting points for our sewing.
Attach your zipper foot to your machine, using the bar on the left of your foot to attach it. When you sew on a zipper you’ll use the little channel underneath your presser foot to help guide the zipper teeth through. Start sewing at one mark (making sure to backstitch) and sew as close as you can to the zipper teeth until you reach the other mark.
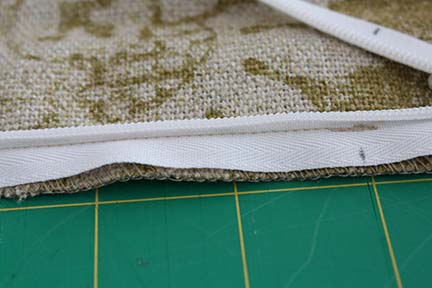
It should look like this when you’re done sewing this side.
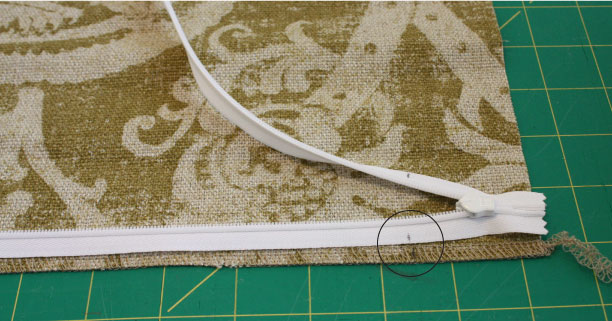
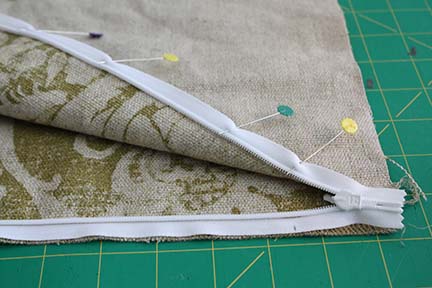
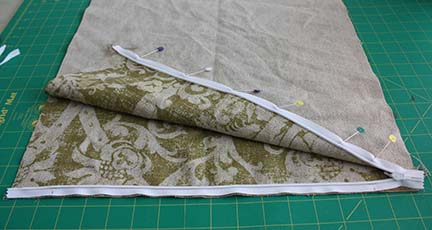
Now we’re ready to attach the other side of the zipper to the back piece of your pillow. Place the back fabric square right side down on top of your front piece. Fold it back slightly. Pull up the zipper side that’s not attached and follow the same steps above. Match up the marks, move the tape to the edge of your fabric and pin in place. Notice that the right side of this zipper side is also touching the right side of your other fabric piece.
It should look like this when you’re done pinning. Now sew this side of the zipper on using the same methods we used above for the first side.
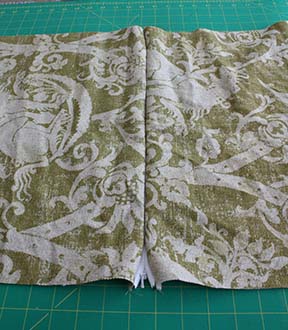
Unfold both your pieces and zip that zipper up! Pretty cool huh?!?
Now we’re ready to finish up our pillow cover! First we’ll need to finish up sewing the bottom seam. The zipper takes up most of the bottom seam but we’ve still got about 2″ on either side to finish up. To do this, unzip your zipper halfway, then fold it up so that the right sides of the fabric are together and the zipper is along the bottom.
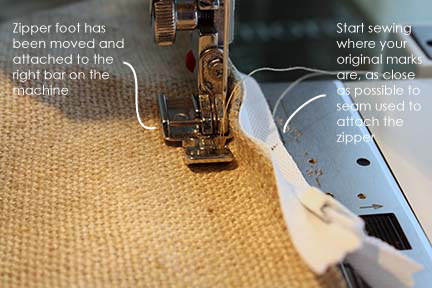
Move your zipper foot so that it’s attached to the machine using the bar on the right side of the foot. Place your pillow underneath the foot and slide it so that the zipper teeth are as close as possible to the right side of the zipper foot. (You may have to feel for the teeth through your fabric.) Find the mark we used to line up the zipper. Start sewing here (backstitch too!) and sew off the edge. Repeat this process with the other side of the zipper.
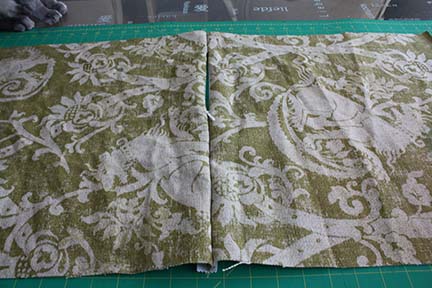
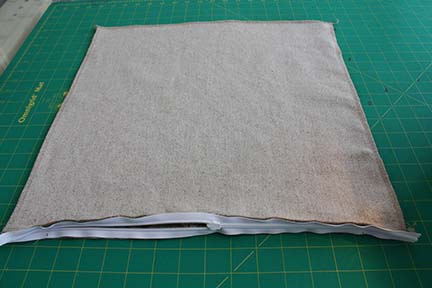
Now the bottom seam of your pillow is complete. You can breath now too! That was the hardest part. Now we’ll use a 1/2″ seam and sew around the other three sides of the pillow!
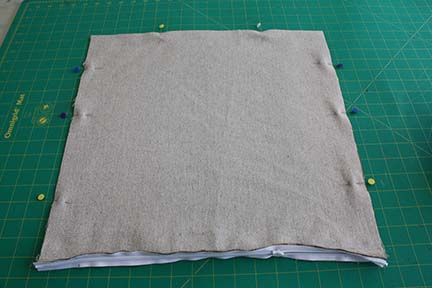
Keep your pillow folded with the right sides together and your zipper along the bottom. (Make sure your zipper is still open halfway! We’ll need the opening to turn it right sides out once we sew the other sides together.) Pin the other three edges and we’ll start sewing!
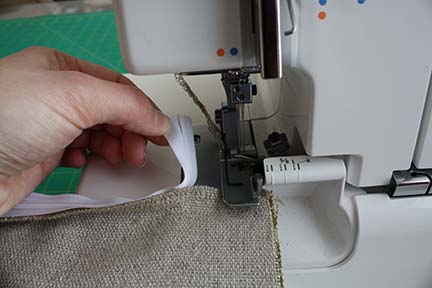
Start on one edge and go all the way around using a 1/2″ seam to complete sewing the sides and top. Pull your zipper away so you don’t sew through it. (I actually did this step in my serger, though you can use a sewing machine for this step too! I was just trying out my new serger!)
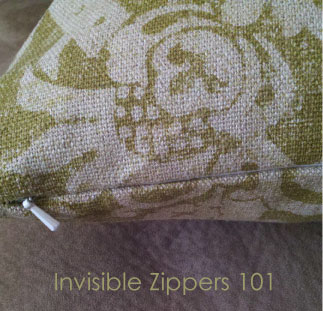
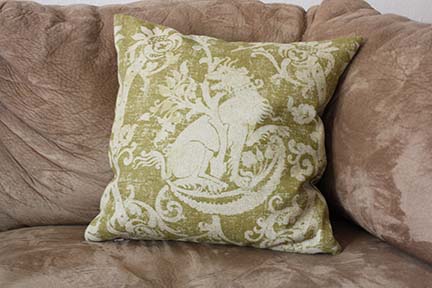
Reach through the zippered opening, unzip your zipper all the way, and turn right sides out! Voila! You’ve got a fancy pillow with no zipper showing at all!
Hope that wasn’t too many pictures for you!! I just wanted to make sure that I made it as easy as possible for you to sew on an invisible zipper! Let me know if you have any questions or if this was helpful for you!
Happy Sewing!
Erin
This is a great tutorial. Thanks! All the pictures are very helpful. I’d like to make some machine-washable throw pillows, so this tutorial will be just the thing.
All the best!
http://www.cuteanduseful.com
great tutorial
Really liked your tutorial, Erin!
Wonderful tut!! Thanks so much Will give it a try. Lynne:)
Great tutorial! I’m new to sewing and I have been wanting to make pillow case covers for my new couch rather than buying expensive pillows. I’m excited to try it out and follow your steps. Any suggestions where I could buy fabrics online?
Thank you SO much for this tutorial! I made 2 pillow covers by following your step-by-step instructions. I’m very proud of myself! :)
I needed to sew up a project real quick and my google search led me to your wonderful step by step instructions (with lots of great how-to pictures). So easy to follow that in no-time I was done. Thank you, Erin.
Best tutorial I found but I do have one question. Why is the fabric cut 1/2″ more on length and width instead of 1″ to allow for the 1/2″ seam allowances? Does it look better a little snugger?
Thank you, Laurie
This was a great tutorial. I have made many pillows using regular metal zippers. I wanted to try the invisible zippers. I began without checking tutorials. I used a zipper which was not as long as the pillow fabric. I sewed all the way to the end. When I zipped it up I had not gotten closed enough to the teeth near the zipper pull. This left a rather wide space where the zipper showed through. I now learned that I must not sew all the way to the end of the zipper so that I have room for stitching the end of the pillow. Thanks so much.
Glad it helped you Katherine!
Thank you so much! I just put in my first zipper using your tutorial and didn’t have one problem… THANKS THANKS THANKS!!
Hi I have spent several frustrating attempts to insert a zip using another website.I printed off your instructions and did it immediately.Thank you so much… the other sites I looked at left out small details. Yours was clear and straightforward.
Thank you once again!!!!
This was very helpful. I haven’t tried it yet, but when I do I will be using your tutorial to follow along with. Thanks for sharing!
Thank you sooo much Erin! I have been putting off sewing my cushion covers because most of the invisible zipper tutorials online were confusing. But I followed your instructions and my cushions turned out AWESOME! Thanks again!
Hi, I loved your tutorial for the invisible zipper. It looks like it’s something that even I can follow. Thank you for posting it. I do have a question — same as Laurie posted above in February, but I couldn’t find a response. Are the seam allowances suppose to be 1/2 inch even though the fabric was cut only 1/2 inch larger on both the width and length for a 16 inch pillow form? If the pillow cover ends up being 15 1/2 inches, I’m worried my 16-inch pillow form won’t fit. Any clarity about this would be so appreciated because I need to make a pillow in like this next week! Thanks agin!
I am not sure, but I think this way the pillow cover will be nice a tight, Kathy.
What type stitch did you use on your serger to sew the remaining three seams? Thank you.
Great tutorial – I wish I had seen it before making the cushion I sewed earlier today which came out ok, but only ‘ok’. I can see this method will give much better results so will be using in in future. Thank you!
I am soooo happy I found your tutorial via Pinterest! Thank you for posting – I have had a huge fear of ever trying to use a zipper on any of my “homemade” pillows! Woohoo! You have made me a zipper user forever! I truly thank you…
Hi, I’m just getting ready to try this for the first time and I’m a little nervous. Your directions say to get a 14″ zipper but when I look at your picture it looks like the zipper goes the whole length of the 16 1/2″ side. Is it supposed to be a 16″ zipper??
I’ve had this pinned for ages. I finally got up the courage to try putting in a zipper. Thank you for such a detailed tutorial. It was so easy to follow. Plus my pillows are perfect! Thanks!
Thank you so much for this wonderful tutorial. Zippers have always been scary for me. Can’t wait to give this a try! :)
THANK YOU !!! You have just saved my life. I am making my niece’s graduation dress which has an invisible zipper (this will be my first zip installation) and I’ve misplaced the book that came with my machine. I saw the picture of the foot and followed the link…..
Going off to practice now on the pillow before I touch the dress.
You are a godsend.
Thank goodness I finally found this tutorial (after looking for help for nearly 20 minutes) I have been sewing for a little over 50 years, mostly clothes. I decided to make a few pillows with really beautiful fabric I found in Philly. I didn’t know how to do an invisible zipper since all my clothes used regular ones. This information was so easy to understand and the pictures helped also.
Thank you so very much for helping an old gal enjoy sewing again.
I wish I would have seen this tutorial about two hours ago! I already did three sides of two pillows thinking I could do the zipper at the end. Is there any way to put in a zipper without unstitching the whole thing?
Thanks so much, Erin! Your web tutorial was extremely helpful. I”m not afraid of zippers any more!
Marvelous, what a blog it is! This website provides helpful information to us, keep it up.
You need not necessarily makie elaborate changes like re-painting the
walls or buying neew furniture to jazz up your teen’s room.
Shag rugs can add texture, bring out the colors of the room and make a dull room appear much more exciting.
Such lolvely ceramics flower pots bring the harmony between people and nature.