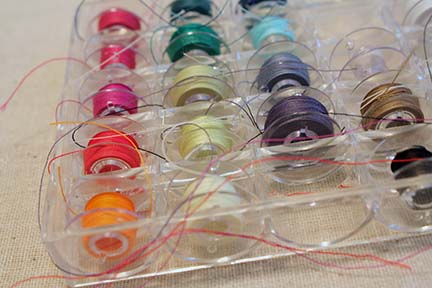
If you sew, you know that your bobbins can go from nice and organized to messy and stringy in a matter of minutes. Case in point:
Looks pretty bad huh? And I promise that I made them all nice and neat less than a week ago and didn’t make it more messy just for a picture! When you go to get one bobbin out, the others just unravel more making an even bigger disaster!
I searched online for bobbin clips to purchase. The only ones I found were for a pack of 10 for almost $10 on Amazon.They included the bobbins too, but they were for Brother machines. I sew on a Janome… Although they use very similar bobbins I didn’t want to pay $10 before shipping for it.
I knew there must be a better way. I needed something clear (so you can see your thread colors), flexible (to accommodate the different amounts of thread on each of your already wound bobbins), and cheap.
Enter my local home improvement store. Surely I could find something clear, flexible, and cheap there! I did! I present to you:
DIY Bobbin Covers
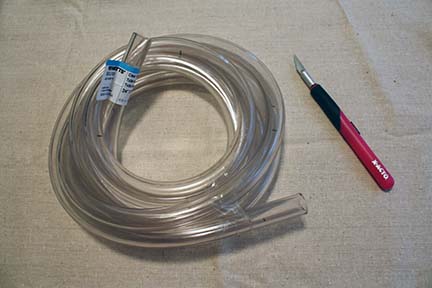
You’ll need just two things:
Clear Flexible Tubing (Found in the plumbing department at your local home improvement store. I got the kind that was 3/4″ on the outside with a 1/2″ diameter on the inside.)
X-Acto Blade
Ready to get going?
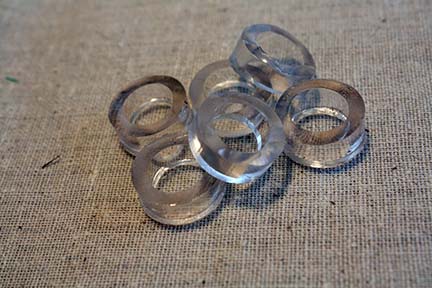
Being careful with the sharp blade, slice off some 1/4″ rings from the tubing.
Then cut down one side of each ring, opening it up.
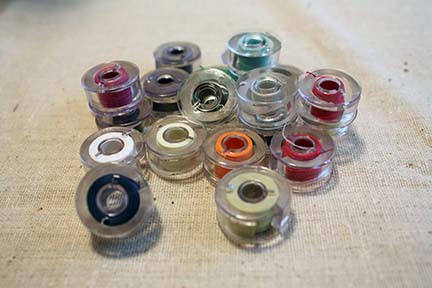
Wrap up your bobbins and slide the ring on top of your thread.
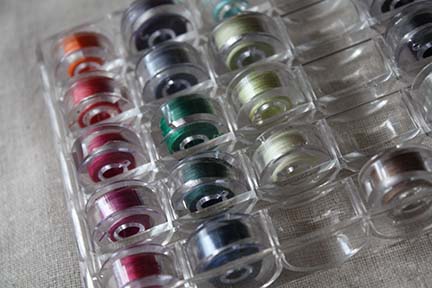
Place back in your storage container. That’s it! How easy and cheap was that? I’m thinking this would make an awesome little gift for the sewer in your life, quilt group, sewing swap, etc.
I love that they are useful no matter how full or empty your bobbin is. You don’t need a different size of tubing, it works for all your bobbins!
Happy Crafting,
Erin

OMG! What a wonderful idea. Thanks for sharing. I can’t wait to get my bobbins all straightened out once and for all.
Thank you again and again.
Purchased the tubing and cut it and placed it around each of my formerly sloppy bobbins and how all is well. Thank you so much for this tip. It made my day.
I used kitchen shear to cut the tube. Safer.
I used a kitchen shear to cut. Safer.
I do use the little pink things from Hobby Lobby to keep bobbin with the spool, which I like. But the thread on the bobbin does come unraveled. I have the tubing, just have not gotten around to cutting it. Is it hard to get off once it is slipped around the bobbin?
I’ve done it, and it’s a pain in the … to get it off.
WOW! This is great. I bought those pink things, and they lost all “snap-back” after one use. What a waste of money and of an idea!
Put them in hot water for a couple of minutes, and they are as good as new. A chap selling them at a Quilt Show told me this, even though it lost him a sale.
astucieux (en français : pas con). Mon mari est plombier cela tombe bien
Bisous à toutes et bonnes années à vos familles.
I’ve been doing this for years! Love it. I have them on all of my longarm bobbins and I write the number of thread color on the side of it with a Sharpie.
Does anyone have a idea for the flat bobbins, that my Singer Machine uses. Thanks in advance
You might try those tiny clear hair bands used for braiding hair. You can get them at the dollar-type stores.
Just sent my husband to the plumbing supply store to get me some of this! Can’t wait to use it. Thanks for this great tip!!!
Brilliant, the unraveling bobbins drive me crazy, I have been looking and pricing is ridiculous on line, going to my hardware store today, Thank you!!!
I think asthma tubing would work too…and at my house that is free.
I have the BIG Bobbins from the B 780 – am still using the colored hair elastics but limited colors. Like the idea of clear tubing. The ready made PINK plastic Bobbin Buddies start losing their elasticity in my place and if on a big bobbin, remain big and no longer fit when the bobbin is not full. I’ll bet tubing would retain its shape longer…. though I might have to look for larger tubing for large bobbins. Anyone experienced?
Hey,
My dad was a plumber and worked for Lowes every Christmas season and whenever they needed extra help as a second job, until he went on disability. So because of this I know they sell plastic tubing at Lowes in a wide variety of sizes. I want to say one type even had a 2 inch diameter on the inside, not the outside. If you don’t have a Lowes, contact your local hardware store and ask them about clear plastic tubing. A lot of the time you can find it at a big name hardware store better than a mom and pop store. Also. if you have fish tanks the tubing works great for the bubblers and for the pumps used to pull the water out of the tank when you want to clean it (also replaces the vacuum hose for fish tank cleaners). The clear tubing, if you fine it big enough to go on your vacuum cleaner hose, also works great (in the thicker less flexible than the thinner clear tubing) as an attachment to get in tiny cracks, be sure to test or try out different sizes, if your vacuum has great suction the thinner can suck itself closed just like the wrapping paper tube trick. however, you can’t get too long or too hard or it won’t flex at all. Also, if you have kids straw cups, and are like my house hold the straws get nasty after a while even with cleaning them after every use, the clear tubing offers a dishwasher safe alternative to throwing the cups out when the straw gets nasty. Plus you can create your own spiral straw cup in side the cup without the straw being hard, or getting funky in the dishwasher. (We had one that had the twisted straw on the outside and it was put in the dishwasher, damn near impossible to clean and the straw lost its shape due to the heat. The clear plastic tubing doesn’t melt (for the most part, depending on the material your store sells you, it can handle high temps.) If you want it to be a spiral straw, determine how much of one you want, as this trick can take some time and patience. Find an old large round prescription pill bottle, water bottle, (small) tomato paste can, or wooden dowel. The wooden dowels also work great for storing the remainder of you tubing when you are not using it all at once. To make a spiral straw, twist the length of tubing you desire (remember to include the amount needed for the part sticking out of the cup where your mouth goes as well as knowing that for every inch you need normally, for a spiral straw it can be 1-3 times as much needed depends on circumference of the cup and how many time you want it to go around). Place on piece of tape across the tube attaching it to your cylinder object of choice, then wrap the tubing tightly around. Place each rotation next to the previous rotation before wrapping the tubing on top of itself. The smaller the cylinder the tighter the spiral, but remember you don’t want the cylinder to be the same size as the cup you are putting the straw in, instead you want it even smaller. Once you are done wrapping tape the end and leave it alone for a couple of days or weeks (depends on if you are forgetful like I can be.) If you want you can put this in the dishwasher to speed up the process, but if you do that use plumbers tape or rubberband to secure the tubing to the cylinder not tape. Tubing is also great for keeping your wires and cords together for different electronics too, and much cheaper than those plastic cord hiding pieces…not to mention easier to cut. Just be careful cutting a slit down the length of the tube to not cut yourself. Then just open the tube and wrap the desired wires and cords in together, if you have multiple devices connected to your tv like we do you can buy a bigger diameter tube to enclosed all the smaller tubing around the individual devices to hose all the tubes together. Also because it is tubing, if you put all of your device socket wires inside a tube and all your device wires in another tube snugly, you can then cut two holes in your wall…one behind your tv and one slightly diagonally from your socket (or baseboard if you used a surge protector, and then use the tube to guide both through top hole to the bottom hole, and then plug your sockets into a surge protector, and plug the device wires into your devices. Since colored twist ties are hard to find if you don’t keep your old ones, grab a color paint pen for each device. This way you can mark which device goes with which set of wires by marking the tubing and device. If you are doing this before you have hung your tv you will want to feed your tubing from the bottom to the top instead. We did this at a friend’s house years ago, but since we rent we don’t want to have to repair too make holes. The tubing also works for desk wires, tool wires, anything that you need to specify, organize, or keep from tangling. It actually does better in my opinion than the bulldog/binder clips…and depending on size and number of devices can be less expensive. The tubing usually costs you cents per foot, while binder clips can get costly depending on how many you need.
Also, if you have necklaces or bracelets, the kind with clamps that get tangled up, if you poke a hole through a piece of plastic tubing and then hook the clamp through one end, then drop the necklace or bracelet down the tube this will help keep it from tangling with others, and with itself (you can go a step further and get wire from your flower department or craft store, even the hardware store if it isn’t too thick of a gauge or expensive, and then use a straight pen, pole a hole big enough for your wire to pass through, and slide the wire through the end ring and then wrap one end of the wire on one side of the tube, and wrap the other end of the wire on the other side of the tube. (May want to buy either a thick wire or excess wire because then wire can tend to break after a lot of bending back and forth. If you don’t want to fuss with the clamp hooking to the tubing, you can also run a wire through it like you did the ring at the bottom. If your chain or bracelet has charms on it, you will want to run a slit down the length of the tubing leaving about an inch at either end that is uncut and poke your holes for the wires. Instead of dropping the chain down the tube like before, you will want to open the slit, slide one end towards one end of the tube, secure with wire, and then let the other side drop down the inside of the tube and securing it with a wire. Your charm will be left out in the pen but the chain wont get tangled. Another friend used to wear stiletto heels and would cut a piece the height and width of the heel, then either slide the tubing on the heel or cut a slit and wrap around. She used this whenever it was raining or if she was walking in muddy grass to protect the heel like a little coat.
TMI…really, just too much. We’re busy folks here!
Thank you. I had no idea you could do so much with plastic tubing.
Sou especialista e ensino tudo o que você precisa para começar sua
profissão de Massagista e ter um bom faturamento mensal.
Tenha autonomia na profissão que mais cresce no país
com o Curso de Massagem online – Saúde Integral. São mais de 20 anos
de experiência na área. Acesse http://www.cursodemassagem.com.br
This is genius!
Awesome idea! Just started to sew and this is a really clever idea…where did you buy your bobbin storage case from?
I found this tutorial a while back, and pinned it so I wouldn’t lose it. I’ve been looking ever since for some of the tubing. I think I have been to every home improvement store (and WalMart) in town looking for the tubing, and I have yet to find any!!
I might have found some at one store, but it was gazoodle feet of it, and the price was outrageous (especially for this use), and since it was wrapped, wasn’t even sure if it was even flexible!!
Sigh!
Never dreamed it would be that hard to find!
It’s super easy to find here.
If you want to email me at critterkeeper78@gmail.com I’ll gladly send you a foot or so. Might take me a wek or so as I have 2 daughters graduating and parties to attend, throw etc, but I’ll send it
Its like you read my mind! You appear to know a lot about this, like you wrote the book in it or something.
I think that you could do with a few pics to drive the message home a bit, but instead of that, this is wonderful
blog. A great read. I will certainly be back.
Great idea! I found my tubing at Ace – lots of sizes so I think I’ve got the right one (haven’t cut mine yet but spreading your idea to all my sewing friends, plus the clerk who helped me at Ace). I think I got my bobbin box like in the picture at Nancy’s Notions online. It’s handy but a total mess with hanging threads. Jo-Ann’s has 8 bobbins that come in a nice plastic box.
Finally got around to cutting my tubing. I found a combination of first using kitchen shears (they didn’t cut all the way through) then finishing with the Xacto knife worked best. The 8 bobbin case wasn’t deep enough with the tubing on the bobbins, but Nancy’s is working great. Thanks so much for taking away one of my sewing frustrations!
Thank You, Thank You, Thank You, Thank You. You have saved my Virgo sanity!